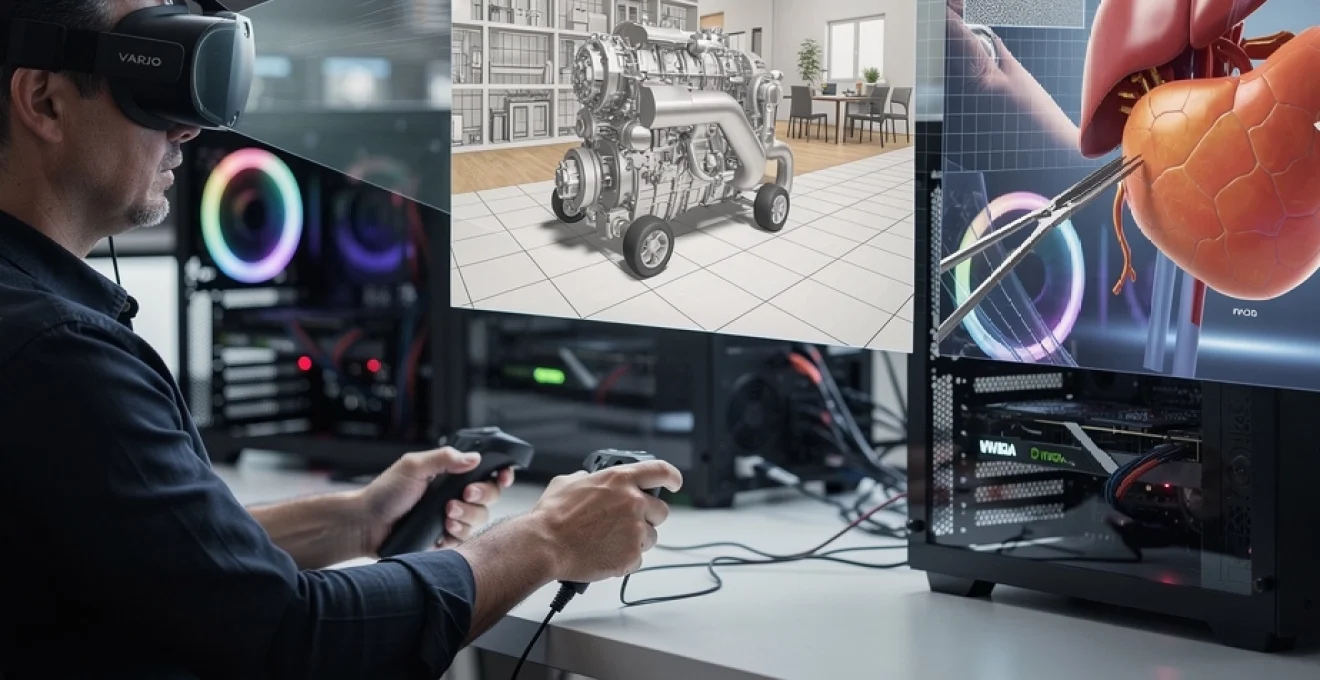
Professional virtual reality applications have evolved far beyond gaming and entertainment, establishing themselves as indispensable tools across medical training, architectural visualisation, engineering design, and industrial simulation. Yet despite these advances, visual clarity remains a persistent challenge that directly impacts user effectiveness and adoption rates. When surgeons rehearse complex procedures in VR or engineers review CAD models at full scale, the quality of what they see isn’t merely aesthetic—it fundamentally determines whether the technology delivers genuine value or falls short of expectations. High-resolution graphics in professional VR contexts aren’t about achieving photorealism for its own sake; they’re about providing the visual fidelity necessary for professionals to make accurate decisions, identify critical details, and work for extended periods without discomfort. The gap between consumer-grade headsets and professional requirements has narrowed considerably, but understanding exactly what constitutes “high-resolution” in VR—and why it matters so profoundly—requires examining the technical landscape from multiple angles.
Pixel density requirements for eliminating screen door effect in HMDs
The screen door effect—that visible grid of pixels that resembles looking through mesh—has plagued VR since its earliest iterations. This phenomenon occurs when the spacing between pixels becomes perceptible to the human eye, breaking immersion and causing visual fatigue during prolonged use. For professional applications where users might spend four to eight hours in a headset, eliminating this effect isn’t optional. The measurement that matters most here is pixels per degree (PPD), which describes how many pixels occupy each degree of your field of view. Human visual acuity peaks at approximately 60 PPD in the central foveal region, though most people cannot distinguish individual pixels beyond 30-40 PPD under normal viewing conditions.
Understanding PPD thresholds in varjo XR-3 and HP reverb G2
Current professional-grade headsets demonstrate varying approaches to pixel density. The HP Reverb G2, popular among flight simulation enthusiasts and some professional applications, delivers approximately 2160×2160 pixels per eye, achieving around 21 PPD across its field of view. This represents a substantial improvement over earlier consumer devices, noticeably reducing the screen door effect for most users. The Varjo XR-3, positioned at the premium end of professional VR, employs a dual-display architecture that combines a high-resolution focus display with a peripheral display. Its central focus area achieves an impressive 60+ PPD, matching human foveal acuity and essentially eliminating visible pixels in the region where you’re directly looking. This approach acknowledges that your eyes don’t require uniform resolution across the entire field of view—a principle that informs several emerging rendering strategies.
Retinal resolution standards: matching human visual acuity at 60 PPD
The concept of “retinal resolution” in VR refers to achieving pixel density that matches or exceeds the resolving power of the human retina. At 60 PPD, individual pixels become imperceptible to the average observer under typical lighting conditions, creating what industry professionals consider true retinal resolution. Reaching this threshold requires either extremely high-resolution displays or narrower fields of view. Current displays achieving 60 PPD across wide fields of view remain prohibitively expensive for most applications, but targeted implementations—like Varjo’s focus display approach—demonstrate that strategic application of high pixel density where it matters most can deliver professional-grade visual quality. For medical visualisation applications, where identifying fine anatomical structures is critical, this level of clarity transforms VR from an interesting novelty into a legitimate training platform.
Comparative analysis of 4K per eye versus 8K per eye display systems
Industry discussions frequently reference “4K per eye” or “8K per eye” specifications, but these figures require context to be meaningful. A 4K display (3840×2160) per eye, when viewed through typical VR optics with approximately 100-degree horizontal field of view, delivers roughly 38 PPD—noticeably better than early headsets but still short of retinal resolution. An 8K display (7680×4320) per eye would theoretically deliver 76 PPD under the same conditions, exceeding the retinal threshold and eliminating perceptible pixelation entirely. However, these calculations assume perfect optics and even pixel
optical performance, which real-world headsets rarely achieve. Lens distortion, chromatic aberration, and effective field of view all reduce the practical pixels-per-degree that reach the eye. From a professional VR standpoint, 4K per eye can significantly improve readability of small text in CAD interfaces or cockpit instruments, but it will not fully remove aliasing or the screen door effect in demanding use cases like surgical planning. 8K per eye systems push closer to the “forget you’re looking at a screen” threshold, yet they introduce enormous bandwidth and rendering demands that only the highest-end GPUs can currently approach in real-time. In practice, many organisations adopt an incremental strategy: start with 2K–4K per eye devices for most workflows, then reserve ultra-high-resolution systems for niche scenarios where every additional pixel directly impacts safety, compliance, or financial risk.
Subpixel rendering techniques in meta quest pro OLED panels
Display resolution in VR is not defined solely by the raw pixel count; subpixel layouts and rendering techniques also play a major role in perceived clarity. The Meta Quest Pro, for example, uses high-end panels where the subpixel structure differs from the traditional RGB stripe found on many LCDs. OLED panels can adopt pentile or custom subpixel arrangements that affect how fine lines, text, and edges appear, particularly in professional VR applications that rely on crisp UI elements. Subpixel rendering algorithms attempt to compensate for these layouts by addressing individual red, green, and blue subpixels separately, effectively squeezing more perceived sharpness out of the same pixel grid.
For professional environments such as data dashboards, command-and-control rooms, or financial visualisation in VR, this has tangible consequences. A well-implemented subpixel rendering pipeline can make a 2K per eye OLED panel feel closer to a higher-resolution LCD when reading small fonts or measuring distances against a grid. However, poor tuning can introduce color fringing and shimmering that becomes more obvious as you move your head, undermining presence and causing eye strain over long sessions. When you evaluate headsets for enterprise deployment, it’s worth testing your actual software in the device rather than relying solely on pixel specs, because different subpixel layouts and rendering paths may favour or penalise your specific visual workload. In many cases, high-resolution graphics paired with intelligent subpixel rendering can bridge part of the gap toward retinal resolution without requiring a full jump to 4K or 8K per eye.
GPU rendering performance demands for High-Fidelity VR environments
Once display resolution climbs into the 4K-per-eye territory, the burden shifts squarely onto the GPU. Unlike a flat 4K monitor, high-fidelity VR must render two slightly offset images for stereo vision, correct for lens distortion, and maintain strict frame rate targets—typically 90 Hz or more—to avoid discomfort. This means your effective rendering workload can be two to three times higher than a comparable desktop application. Professional VR applications, from complex BIM models to high-resolution medical scans, push this even further through massive polygon counts and heavy shader use. To keep latency low and visuals sharp, organisations need to understand how modern GPUs like the NVIDIA RTX 4090, combined with advanced rendering techniques, keep these workloads within real-time bounds.
NVIDIA RTX 4090 benchmarks for native 90hz stereoscopic rendering
The NVIDIA RTX 4090 currently represents the upper end of single-GPU performance for real-time graphics, and it is often the reference point for demanding professional VR setups. In controlled benchmarks with optimised engines such as Unreal Engine 5 and Unity HDRP, a 4090 can sustain native 90 Hz stereoscopic rendering at resolutions approaching 3K–4K per eye in well-optimised scenes. That said, raw resolution is only part of the story. Once you add complex materials, dynamic shadows, volumetric lighting, and high-resolution textures typical of digital twins or automotive design reviews, frame rates can quickly drop into the 60 Hz range or below if no optimisation strategies are applied.
Real-world case studies shed more light on this. Automotive visualisation pipelines that import CAD data with tens of millions of polygons often rely on a 4090 paired with aggressive mesh decimation and level-of-detail (LOD) systems to maintain 90 Hz in VR. Similarly, architectural firms using path-traced lighting for client walkthroughs may target 72 Hz instead of 90 Hz as a compromise between realism and comfort, while still relying on supersampling and temporal anti-aliasing to avoid shimmering. The key lesson is that even with a top-tier RTX 4090, high-resolution VR graphics require careful balancing of resolution, shading complexity, and temporal techniques to hit the frame rate thresholds that professional users expect.
Foveated rendering implementation in tobii eye tracking systems
Foveated rendering is one of the most promising techniques for making extremely high-resolution VR practical. The idea is straightforward: you render the area where the user is directly looking (the foveal region) at full resolution and quality, while gradually reducing resolution and shading complexity in the periphery where the eye is less sensitive. Modern eye tracking systems from companies like Tobii can sample gaze direction at 90–120 Hz or more, feeding that information into the rendering pipeline with only a few milliseconds of latency. When implemented well, you gain a large reduction in GPU workload with almost no perceived loss in visual quality—especially in professional applications where users focus intensely on specific objects or UI elements.
In practice, however, foveated rendering introduces several engineering challenges. You need tight integration between the eye tracking hardware, the VR runtime, and the rendering engine to ensure that the high-resolution region follows the user’s gaze without lag or jitter. If latency is too high, users may notice a briefly blurry zone before the sharp region catches up, which can be more distracting than a uniformly lower resolution. For workloads such as reading fine labels in a chemical plant model or examining microstructures in medical imaging, the payoff can be substantial: some studies report GPU savings of 30–50% while preserving perceived clarity. As resolutions trend toward 8K per eye, foveated rendering is likely to move from “nice-to-have optimisation” to an essential building block of professional VR graphics pipelines.
Variable rate shading strategies for maintaining frame rate consistency
Variable Rate Shading (VRS) extends the same principle of selective detail, but at the level of pixel shading instead of geometry. Rather than computing a full set of lighting and material calculations for every pixel, VRS lets you shade groups of pixels with a single calculation in regions where detail is less critical. Think of it as a more granular, hardware-level complement to foveated rendering. On NVIDIA RTX and modern AMD GPUs, VRS can be controlled through APIs in DirectX 12 and Vulkan, enabling engines like Unreal and Unity to define shading rate maps that vary across the screen.
For professional VR environments, VRS is particularly useful in scenes with large uniform areas—like walls, floors, or skies—or in motion-blurred regions where fine detail would not be visible anyway. Imagine an architectural walkthrough where the user’s attention is on a detailed stairway model; the engine can apply higher shading rates there while reducing shading work on distant walls and ceilings. This helps maintain stable frame rates when users turn their heads quickly or when complex materials enter the field of view. Consistency matters more than occasional peaks: a brief drop from 90 Hz to 70 Hz can feel worse than running at a steady 80 Hz, so VRS becomes a tool not just for pushing higher average performance, but also for smoothing out spikes that might otherwise cause stutter and discomfort.
Multi-gpu configurations for parallel projection workloads
As VR scenes grow in complexity and you aim for higher resolutions and refresh rates, a single GPU may no longer suffice—especially in multi-user or multi-display setups such as CAVE environments and VR powerwalls. Multi-GPU configurations, once popular in gaming via SLI or CrossFire, are regaining relevance in professional VR for parallelising projection workloads. One common strategy is to dedicate one GPU per eye, or even one GPU per display in multi-panel installations, effectively doubling or tripling the available rendering horsepower. Modern professional drivers and APIs allow explicit control over how rendering tasks are distributed, avoiding some of the latency and scaling issues that plagued earlier consumer multi-GPU solutions.
However, multi-GPU VR is not a silver bullet. Software must be carefully architected to avoid excessive inter-GPU communication, which can eat into any performance gains. For example, shared resources like global illumination data or physics simulations must be synchronised efficiently to prevent visual discrepancies between eyes. In high-stakes training environments—such as flight simulators certified for pilot training or industrial safety simulations—any mismatch can be unacceptable. When you are planning large-scale VR installations, it’s wise to prototype with your actual content and measure end-to-end latency and frame pacing, rather than assuming linear scaling from single-GPU benchmarks. Still, for organisations that genuinely need 8K per eye at 120 Hz in complex environments, multi-GPU architectures remain one of the few viable paths forward.
Texture streaming architecture for medical and engineering simulations
High-resolution graphics in professional VR are not only about polygon counts and display pixels; texture quality is equally critical. In medical simulations, textures may encode high-resolution MRI or CT data, subtle tissue variations, or diagnostic overlays. In engineering, they can represent surface finishes, weld seams, or stress distribution maps. Loading all of these textures at full resolution into GPU memory at once is often impractical, especially when you target 4K or 8K per eye VR rendering. This is where robust texture streaming architectures come in, allowing you to dynamically load, unload, and downsample textures based on where the user is looking and what level of detail is required.
Modern engines implement texture streaming using virtual texturing or “mega-texture” systems, which break textures into small tiles and only keep the needed tiles in high resolution. As the user approaches a piece of machinery or zooms into a specific organ in a surgical rehearsal, the engine requests higher-resolution tiles from system memory or even from NVMe storage. When combined with eye tracking and foveated rendering, you can prioritise ultra-high-resolution tiles exclusively in the gaze region, saving bandwidth and memory. The benefit is twofold: you maintain crisp visual fidelity where it matters most, and you prevent stalls or stutters caused by sudden large texture uploads. For teams building professional VR applications, designing content pipelines that support tiled textures, proper mipmap generation, and hierarchical level-of-detail is essential to scale up to truly high-resolution simulations.
Anti-aliasing methods for reducing visual artifacts in CAD visualisation
Sharp edges and thin lines are the backbone of CAD visualisation, but they are also the most vulnerable to aliasing and flicker in VR. Even when you use a high-resolution headset, diagonal edges and fine geometry can shimmer as you move your head, especially against contrasting backgrounds. This is more than a cosmetic issue: in engineering reviews, misreading a line or edge can lead to incorrect assumptions about tolerances or clearances. Effective anti-aliasing strategies are therefore a crucial part of delivering high-resolution graphics that actually look stable and reliable inside a headset. The challenge is to balance visual quality with the strict performance budget imposed by stereoscopic, high-refresh-rate rendering.
MSAA versus SSAA performance trade-offs in professional applications
Multisample Anti-Aliasing (MSAA) and Supersample Anti-Aliasing (SSAA) remain two of the most widely discussed techniques in high-end VR. MSAA works by sampling depth and coverage at multiple points within each pixel, smoothing out edges without fully re-rendering the scene at a higher resolution. SSAA, by contrast, renders the entire scene at a higher resolution and then downsamples, effectively increasing both geometric and shading detail. In CAD-heavy VR applications with lots of sharp edges and wireframes, SSAA often delivers the cleanest results but at a very high computational cost.
Why not simply crank SSAA until all artifacts disappear? Because in a stereoscopic 90 Hz environment with millions of pixels per eye, SSAA can easily double or triple the GPU workload, which is rarely acceptable even on top-tier hardware. MSAA offers a more efficient compromise, particularly for forward-rendered pipelines where geometry edges dominate the aliasing. Many professional VR tools adopt a hybrid strategy: moderate MSAA (e.g., 2x or 4x) combined with selective supersampling of key UI elements or regions where engineers are likely to focus. This allows you to preserve edge quality on critical components without exhausting GPU resources across the entire frame.
Temporal Anti-Aliasing integration with motion reprojection
Temporal Anti-Aliasing (TAA) has become the default in many real-time engines due to its ability to smooth both spatial and temporal aliasing by accumulating information over multiple frames. In VR, however, TAA must be handled with extra care. Motion reprojection—techniques such as asynchronous reprojection or motion smoothing—interpolates new frames based on previous ones to maintain a stable refresh rate when the GPU cannot keep up. When TAA and reprojection interact, they can sometimes create ghosting, smearing, or trails, especially around moving objects or high-contrast edges. In professional VR, where clarity and comfort trump raw graphical spectacle, such artifacts can be more than a minor annoyance.
To integrate TAA effectively, engines often rely on motion vectors, per-eye history buffers, and confidence metrics that control how much of the previous frame’s information to reuse. In scenarios like rotating complex assemblies in an engineering review or moving endoscopic tools in a surgical simulator, you may need to tune TAA settings specifically for VR: reducing history length, clamping sharpening filters, or disabling certain reconstruction passes that work well on flat screens but break down in stereo. The payoff is considerable. Properly tuned TAA combined with motion reprojection can maintain stable 90 Hz (or synthesised 90 Hz) output while greatly reducing shimmering on distant geometry, making long sessions in dense technical scenes far more comfortable for the eyes.
Supersampling ratios for precision engineering reviews in unity and unreal engine
Supersampling remains a powerful, if expensive, tool for improving perceived resolution and reducing aliasing in high-stakes scenarios. In both Unity and Unreal Engine, you can configure a render scale or resolution multiplier that effectively instructs the engine to render at, say, 1.3x or 1.5x the headset’s native resolution. For precision engineering reviews, where teams might be checking tolerances of a few millimetres on full-scale models, these modest supersampling ratios can make the difference between a line that appears slightly jagged and one that looks solid and trustworthy. The key is to avoid the temptation to jump straight to extreme values like 2.0x, which can cripple performance without delivering proportional visual gains.
A practical approach is to run controlled tests with real production models. For example, start with a 1.0x render scale and gradually increase in 0.1 increments while monitoring GPU utilisation, frame time, and user feedback. Engineers can be asked simple questions such as: At what setting can you reliably read dimension labels or judge surface continuity without leaning in? In many cases, the “sweet spot” falls between 1.2x and 1.5x, especially on a high-end GPU like an RTX 4090. By combining moderate supersampling with MSAA or TAA, you can reach a level of visual stability that approximates “paper-like” clarity for CAD lines, without sacrificing the frame rate and comfort required for effective professional collaboration.
Photogrammetry asset quality standards for architectural walkthroughs
Photogrammetry has revolutionised how we capture and reconstruct real-world spaces, enabling highly realistic architectural walkthroughs in VR. Yet high-resolution scanning alone does not guarantee a comfortable or useful experience. For professional use cases—such as reviewing heritage buildings, pre-construction site conditions, or premium real-estate developments—the challenge is to strike the right balance between geometric detail, texture resolution, and performance. Excessively dense meshes and 16K textures may look impressive in still renders, but they can easily overwhelm even powerful GPUs once you add stereoscopic rendering, lighting, and interaction on top.
Establishing asset quality standards is therefore essential. Many studios adopt guidelines like limiting per-room polygon counts, capping texture resolution per object, and enforcing consistent texel density across surfaces so that walls, floors, and fixtures all appear equally sharp in VR. Clean normal maps and carefully authored roughness values can often replace raw geometric detail, reducing triangle counts without sacrificing perceived fidelity. Just as importantly, photogrammetry assets need thorough post-processing to remove artifacts such as floating geometry, baked-in lighting inconsistencies, or noisy textures that can cause eye strain when viewed at close range in a headset. When you treat photogrammetry not as a one-click solution, but as a starting point in a disciplined content pipeline, you can deliver architectural VR experiences that feel both richly detailed and visually comfortable for extended client sessions.
Latency reduction through advanced frame buffering in surgical training platforms
Latency is the silent enemy of professional VR, and nowhere is this more apparent than in surgical training platforms. When a trainee moves a virtual instrument and the visual feedback lags behind by more than a few tens of milliseconds, the mismatch between proprioception and vision can quickly cause motion sickness and undermine skill transfer. High-resolution graphics increase the rendering workload, which in turn can push frame times higher if not carefully managed. Advanced frame buffering strategies aim to minimise motion-to-photon latency—the time it takes from a user’s movement to the corresponding pixel update on the display—while still supporting detailed anatomy, complex lighting, and high-fidelity simulation of tools and tissues.
Modern VR runtimes employ techniques such as late latching and asynchronous timewarp to mitigate latency. Late latching allows the system to sample the latest head and controller positions as close as possible to the actual display scan-out, effectively “refreshing” the view even if the main rendering pass completed a few milliseconds earlier. Asynchronous timewarp or spacewarp takes this further by reprojecting the previous frame’s image based on updated motion data, synthesising new frames when the GPU cannot keep up with the target refresh rate. In surgical VR, these approaches are often combined with predictive tracking algorithms that anticipate small, rapid movements of the surgeon’s hands. The result is an experience where instruments feel tightly coupled to real-world motions, even when high-resolution graphics and complex simulations push the GPU toward its limits.
For developers of surgical training platforms, the takeaway is clear: high-resolution visual fidelity must go hand-in-hand with rigorous attention to latency. Profiling tools should measure not just average frame rate, but full motion-to-photon latency, including sensor sampling, CPU processing, GPU rendering, and display scan-out. Optimisations such as reducing unnecessary overdraw, batching draw calls, and leveraging foveated rendering can then be targeted where they have the greatest impact on frame time. By treating buffering and reprojection strategies as first-class design considerations rather than afterthoughts, you can create VR surgical environments where high-resolution graphics enhance, rather than compromise, the realism and effectiveness of training.